Upside-down Cake in my Upside-down Life

I’ve been cooking up a storm, but back to school is upon us, and we’ve had some family stuff going on, so time has been a precious commodity.  I just haven’t had the time or energy to write up my creations.  But my favorite cooking season is coming, and with it comes soup, stew, chili, roasts, and a hundred other possibilities.  During the summer I cook most days, but once the work schedule is back to normal, most of my major cooking happens on the weekends. Sometimes, since cooking is my therapy, I do have a burst of energy on a weeknight and get a few things done.  Last night was one of those nights, and cake makes everything better.

I made this masterpiece once before for a dinner and games party we were attending about a month ago.  The recipe is from Good Housekeeping’s June 2016 issue. It surprised me that it was so recent– I don’t remember tearing out the page, and I couldn’t even tell why I pulled it; the other recipes included cocktails and a tzatziki sauce, which are also right up my alley.  But I’m sure glad I tried this recipe, because it’s a winner.

http://www.goodhousekeeping.com/food-recipes/a38865/upside-down-cake-recipe/

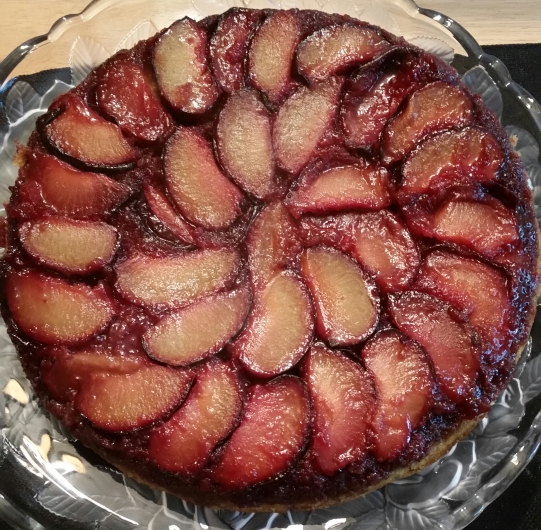
When you flip this cake out of the skillet, the gorgeous summer fruit will be on display. Try using the following measurements for the stone fruit of your choice:

1 1/2 lbs. peaches, peeled, halved and cut into eighths OR
3/4 lb. cherries, pitted and halved OR
1 1/2 lbs. plums, halved and cut into eighths


TOTAL TIME:
1:15
PREP: 0:25
LEVEL: Easy
YIELD: 10 servings

Ingredients
  • 3 tbsp. plus 1/2 c. (1 stick) butter, softened
  • 1/2 c. packed light brown sugar
  • Choice of fruit (see above for measurements)
  • 1 1/2 c. all-purpose flour
  • 2 tsp. baking powder
  • 1/4 tsp. salt
  • 1 c. granulated sugar
  • 3 large eggs
  • 1 tbsp. vanilla extract
  • 1/2 c. whole milk

Directions

  1. Preheat oven to 350 degrees F.
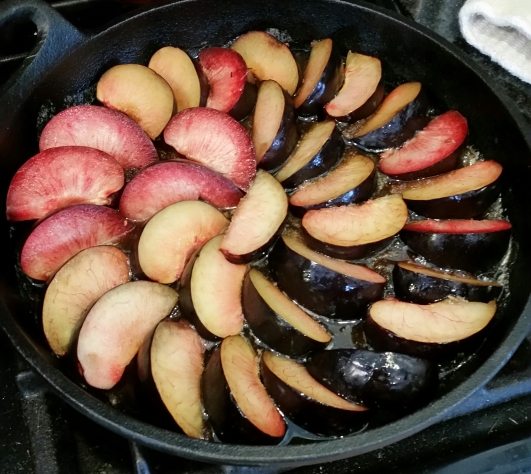
  2. In 12″ heavy skillet with oven-safe handle, melt 3 tablespoons butter on medium, swirling to coat side of pan. Sprinkle brown sugar evenly over butter and continue to cook 1 minute. Remove from heat. Add fruit, cut sides down, to fill entire bottom of skillet.
  3. In a large bowl, whisk flour, baking powder, and salt. In another large bowl, with mixer on medium speed, beat remaining 1/2 cup butter and granulated sugar until light and fluffy, scraping side of bowl occasionally. Beat in eggs, 1 at a time, then vanilla until well blended. With mixer on low, beat in flour mixture and milk, alternating, until just blended.
  4. Pour batter over fruit in skillet; gently spread into even layer. Bake 35 to 40 minutes or until toothpick inserted into center comes out clean. Cool cake in skillet on wire rack 15 minutes. Loosen sides of cake from pan with mini offset spatula or paring knife.
  5. Place large serving platter over skillet. Carefully invert cake onto platter and remove skillet; cool slightly to serve warm or cool 2 hours and serve at room temperature.
Nutritional Information (per serving): Calories 360; Protein 5g; Carbohydrate 53g; Total Fat

The first cake I made with plums, which I picked up on clearance at Woodman’s.  I felt like cutting the fruit into eighths was too large, but I followed the directions for a change instead of following my instincts.  (Turns out eighths was perfect, and I’ll explain why in a minute).  The only skillet we have that we know is oven-proof is cast iron, so that’s what I used.  The butter and brown sugar melted beautifully, and I managed to arrange the fruit quite artfully.  The stone fruit is recommended in this cake because it has the density to stand up the the hot pan in step one, as well as 40 minutes in the oven in step 4.  Leaving it in large slices helps keep it from disintegrating while baking.  I used 5 plums, and they were on the large side, so the slices looked pretty thick.

20160904_135035-1

The cake batter came together perfectly.  It is a thicker consistency, more like a pound cake batter, so it took some careful spreading to get it to cover the fruit without moving the slices around.  I think the cake baked for about 35 minutes.  I was worried that it would bubble over, but it rose just enough and stayed exactly put (measure your baking powder precisely, and it wouldn’t hurt to line the bottom of the oven with foil or a baking sheet just in case). The cake turned the most beautiful golden brown, but it looked very dry.  Don’t worry!  Once you flip the cake out of the skillet, it is sweet, moist, and gorgeous!

20160904_151032-1

I wouldn’t change one thing about this recipe, and I can’t begin to describe how it tastes.  Sweet and caramel-y, but well-balanced from the neutral flavor of the cake (shocking to me, because a cup of sugar seems like a lot for the volume of batter produced.  I made this cake again for no occasion at all, except that I bought some peaches at the farmer’s market and wanted to see if my first attempt was beginner’s luck.

20160916_191411-1

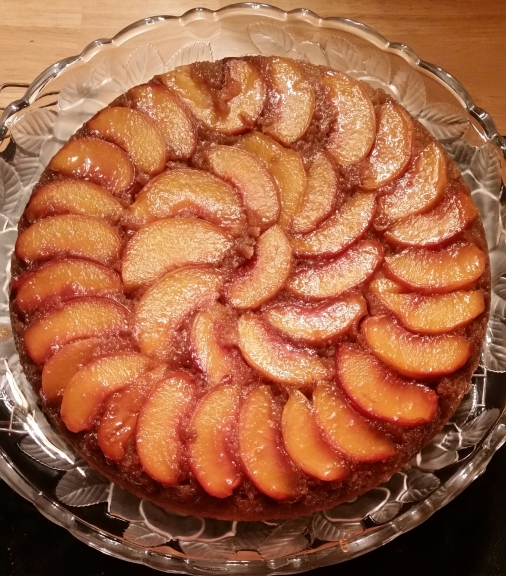
It was not beginner’s luck!  This cake is so user-friendly, but I have to give a shout-out to Husband, because flipping this pie out of the cast iron definitely takes four hands. Tendinitis has weakened one of my wrists, and I just don’t trust that I’d be able to handle the weight of the skillet and the giant glass platter on my own.  So Husband flipped and I supported the platter as the cake released (2 for 2 with nothing sticking in the pan).  Make this cake! Because it’s easy, because it’s beautiful, because it’s delicious.  Because it’s the end of summer and the fresh fruit is waning.  But mostly, because it’s cake!

Quinoa Overload

I may have mentioned that I made too much quinoa for my 2 previously posted salads.  Not knowing if quinoa freezes well, I wanted to use up as much of the cooked grain as possible before leaving for our big vacation.  I came across this recipe in the August 3 Food & Dining Section of the Chicago Tribune.  Grain-free, meatless, and a cup of quinoa?  Sign me up!

http://www.chicagotribune.com/dining/recipes/sc-veggie-burgers-food-0729-20160726-story.html

Hearty cocoa black-bean burgers

Prep: 20 minutes
Cook: 20 minutes
Makes: 4 burgers

From “Minimalist Baker’s Everyday Cooking: 101 Entirely Plant-based, Mostly Gluten-Free, Easy and Delicious Recipes” by Dana Shultz.

1 cup raw walnuts
2 to 3 tablespoons grape seed or avocado oil, divided
1/2 medium white onion, finely diced
3 cloves garlic, minced
Pinch of salt and pepper, plus more to taste
1 tablespoon chili powder
1 tablespoon ground cumin
3 tablespoons unsweetened cocoa powder
1 tablespoon coconut sugar, optional
1 can (15 ounces) black beans, rinsed, drained, patted dry
1 cup cooked quinoa

1. Heat oven to 350 degrees. Spread walnuts on a baking sheet. Toast for 10-12 minutes, or until fragrant and light golden brown. Allow to cool slightly.

2. In the meantime, heat a skillet over medium heat. Once hot, add 1 tablespoon oil, onion and garlic. Season with a pinch each of salt and pepper; cook until onion is fragrant and translucent, 4-5 minutes. Remove from heat; set aside.

2. Add cooled walnuts to a food processor or blender with the chili powder, cumin, cocoa powder, coconut sugar, if using, and salt and pepper to taste. Blend well. Set aside.

3. Put the beans in a bowl. Mash well with a fork, leaving only a few beans whole. Add quinoa, nut-spice mixture, and sauteed garlic and onion; mix to combine. The mixture should have the texture of moldable dough. If it’s dry, add an extra 1-2 tablespoons of oil or water. If wet, add more walnut meal or breadcrumbs. Taste and adjust seasonings as needed.

4. Divide into four even patties. (To help form them, line a 1/2 cup measuring cup with plastic wrap, pack in the burger mixture, lift it out and flatten slightly.

5. Heat the same skillet over medium heat. Once hot, add enough grape seed oil to form a thin layer on the bottom of the skillet. Carefully add the burgers. Brown on each side, flipping gently and controlling the heat if they brown too quickly, 3-5 minutes. Serve on toasted hamburger buns with desired toppings. (To crisp and firm up the burgers, place them in a 375-degree oven for 10-20 minutes.)

Nutrition information per patty: 386 calories, 24 g fat, 3 g saturated fat, 0 mg cholesterol, 37 g carbohydrates, 3 g sugar, 13 g protein, 358 mg sodium, 13 g fiber

Note: To freeze the burgers, brown them on both sides as instructed. Cool completely and freeze on a parchment-lined baking sheet for 4-6 hours, or until firm. Transfer to a freezer-safe bag or container. Freeze up to 1 month. Reheat in a 375-degree oven for 20-30 minutes, or until warmed through and golden brown.

While I toasted the walnuts in a skillet over medium heat (it was much too hot out to turn on the oven), I started gathering the other ingredients, returning to the skillet frequently to toss the nuts so they wouldn’t scorch.  While cooking the onion and garlic, everything else went in the food processor, including the beans (after step 3).  The mixture came together beautifully with no additional water, oil, or breadcrumbs (I did not use the coconut sugar).  Some of the burger edges were cracking off as I was cooking them, but I think that was more a result of my freeform patties than the texture of the “meat”.

20160811_192333

I was hesitant to put all 3 tablespoons of cocoa powder into the mix, and I was right.  There was a definite pasty bitterness, not so much in the bite, but in the aftertaste.  The bite itself was great– cumin and chili spice came through, and for a meatless burger, the texture was not too far off a real burger (minus the juiciness).  After a couple of bites, we added green salsa as a condiment, which added some heat and the missing moisture.  We talked about what other condiments or toppings we could add without it clashing with the cocoa (cheese? probably not). We decided mayo or a beet ketchup we’ve picked up on our travels might work, as well as mild salsa or hot sauce.  The tomatoes weren’t strange against the burger, so a traditional salsa would probably work.  Verdict:  I would probably try these again, reducing the cocoa powder by at least a tablespoon, and possibly increasing the onion and garlic.  They are an interesting vegan option, so if you are looking to liven up or expand your number of Meatless Mondays, these are worth a try.  After all, chocolate is its own food group.

Farmers’ Market Finds

CSA season is about half over, and Jin has gone home to see her parents for a few weeks. This leaves me with the entire box, which is exciting, terrifying, and exhausting.  I’ve read many a blog post (tongue-in-cheek) about the joys and tragedies of having a CSA share.  Seriously, if you do not love to cook, I’m not sure how you handle all this produce.  We are currently overrun with cucumbers (3 batches of pickles), zucchini (brownies and zucchini bread), corn (6-8 ears a week!), and here come the tomatoes, peppers, and basil (1 batch of sauce yesterday handled those three in one application).  We are still sort of doing the grain-free thing at our house, and I used the box of quinoa-based pasta in a salad last week, so I decided to make this pasta salad with quinoa instead.  It’s from June 2015’s Good Housekeeping. I can’t find an online version anywhere except a picture of the clipping on a Pinterest page:

https://au.pinterest.com/pin/389983648960877749/

Farmers’ Market Pasta

1 pound campanelle or penne pasta
1/2 small red onion, very thinly sliced
1/2 pound green beans, trimmed
1 tsp. plus 1/4 cup olive oil
4 large ears corn, husked
1/2 cup sherry vinegar
1/4 cup fresh lemon juice
1 clove of garlic, crushed with press
12 oz. multicolored cherry tomatoes, halved
1/4 cup fresh basil leaves, finely chopped

  1. Heat outdoor grill on medium-high. Cook pasta as label directs. Soak onion in ice water for at least 30 minutes.
  2. Fold 12″ by 30″ sheet of aluminum foil in half. In large bowl, toss green beans with 1 teaspoon of oil and 1/8 tsp of salt. Place beans in center of foil. Crimp edges of foil to seal tightly. Grill 15 minutes, turning over once halfway through. Grill corn 8-10 minutes or until charred in spots, turning occasionally.
  3. Transfer bean packet and corn to cutting board, let cool. In large bowl, whisk together vinegar, lemon juice, garlic, 1/4 cup oil, 3/4 tsp. salt and 1/4 tsp. black pepper. Add cooked pasta and tomatoes to bowl, tossing to combine.
  4. When cool enough to handle, slice beans into 2 inch lengths and cut corn kernels from cobs. Add to bowl with pasta along with basil, tossing until well combined. Drain onions, pat dry, and add to pasta, tossing.

    Serves 8: about 355 cal, 11 g protein, 60 g carbs, 10 g fat (2 g sat) 4 grams fiber, 275 mg sodium

    I cooked 3 cups of dry quinoa, intending to use it in another recipe (post coming soon).  Oops!  It made much more than I expected.  I sauteed my grean beans and microwaved my corn.  I’m sure the grill flavor is lovely, but my corn was already cooked before I decided on this recipe, so maybe I’ll grill the veggies next time.  I didn’t have sherry vinegar, so I used a raspberry balsamic vinegar instead.  Our grean beans were from the farmers’ market, and I added some peas that we got there as well.  It was handy that the CSA contained red onions this week. Only the tomatoes came from the store.

20160806_132432

Verdict: delicious!  The quinoa was light and highlighted the crisp vegetables.  I loved the sweetness of the raspberry in the vinaigrette (but you could just as easily use a store-bought Italian dressing or other flavored vinaigrette).  The onion and basil added great pops of flavor, as did each vegetable in turn.  I will definitely be making this one again. This would make a perfect picnic dish or side dish if you wanted to bring something fresh and healthy to a barbecue or dinner party.  People might rather have the traditional pasta salad, but I thought the quinoa substitution was great (adjust your nutrition information accordingly).

Edamame Hummus

I’m not finding myself in a very Olympic mood this year, which is odd because I usually can’t get enough of the non-stop coverage.  I finally had some people over this week for a get together, and grabbed this recipe for a little international flair.  It was published in Parade Magazine on May 17, 2015, and Husband clipped it because a) we love hummus, and b) we always have edamame in the freezer.

http://parade.com/396941/parade/go-global-with-hummus/

Asian Edamame “Hummus”

By ALISON ASHTON
SERVES 4-6
 

INGREDIENTS

  • 1 (10-oz) pkg frozen shelled edamame (green soybeans)
  • 2 Tbsp toasted sesame oil
  • 1 Tbsp creamy peanut butter
  • ¾ tsp salt
  • ¼ tsp Sriracha sauce
  • Juice of 1 lime
  • 1 garlic clove, smashed
  • 6 Tbsp ice water

DIRECTIONS

  1. Thaw edamame according to package directions. Place in a colander and rinse with cold water; drain.
  2. Combine edamame, oil, peanut butter, salt, Sriracha, juice and garlic in a food processer or blender. Process to combine, pausing to scrape down sides as needed. With motor running, add ice water through food chute; process until smooth.
  3. Scrape into a bowl. Let stand at room temperature for 30 minutes to allow flavors to develop.

COOK’S NOTE

Serve with: Cut-up vegetables and rice crackers.

I decided to thaw my edamame in the microwave (in the bag, for 3-4 minutes), as I do when we serve it as a side vegetable.  I had to let it cool a few minutes before I could shell it (which I did on the couch in front of the TV, not tuned to the Olympics).  I love my food processor!  It made quick work of all these ingredients.  I was afraid that I added too much water; my hummus looks a little wet or thin in the pictures, but a little time in the refrigerator firmed it up.

20160807_113341-1

I served this hummus with pita chips, cucumber slices, baby carrots, and celery sticks.  The flavor was rich and salty.  It was VERY sesame forward, which I didn’t mind but it was very powerful with each bite.  If you aren’t a fan of the sesame oil you could reduce the sesame and replace it with half olive oil to decrease the pungency.  My spread seemed a little grainy, which may be the nature of this dish, or it might have benefited from a little more processing time.  Either way, I thought this dip was great.  You go go a little heavier on the lime and/or the Sriracha without it becoming overpowering; it could actually help tame the sesame flavor. Verdict: I will definitely make this again, and probably soon, because it was gone within 2 days of the gathering.

Gorp

I love words.  I majored in English with an emphasis in writing, I adore puns, and I’m always up for a rousing game of Scrabble.  I play Words with Friends almost daily, but sometimes, if my letters or the board are particularly bad, I hand the phone off to Husband, who can usually help me out.  One day he played the word gorp.  I’d never heard it before, and looked it up even after his explanation.  Dictionary.com defines it as “a mixture of nuts, raisins, dried fruits, seeds, or the like eaten as a high-energy snack, as by hikers and climbers.”  The urban dictionary adds that it may be an acronym for “good old raisins and peanuts.” Since the sticky homemade granola I made a couple of weeks ago was a rousing success with Husband (he’s been eating it by the handful), when I came across this recipe from Prevention, July 2013, it was a natural second attempt to find another desirable low sugar snack (or breakfast).

http://www.prevention.com/food/food-remedies/vegan-recipes-from-mark-bittman/slide/2

Good Morning Gorp

Makes 3½ cups

Put 1½ cups old-fashioned rolled oats in large skillet over medium heat. Toast, shaking pan frequently. Transfer to bowl. Add 1 cup dried fruit (raisins, cranberries, blueberries, papaya, or mango, chopped as needed); ½ cup nuts (such as peanuts, cashews, almonds, or pistachios), salted or not; ¼ cup pumpkin seed kernels; and ¼ cup unsweetened dried coconut flakes. Season with salt. Eat from a cup or store in an airtight container.

NUTRITION (per 1/2 cup) 233 cal, 6 g pro, 31 g carb, 5 g fiber, 12 g sugars, 10.5 g fat, 3 g sat fat, 75 mg sodium

So I told you recently that it’s clean out/use up stuff time  around here.  This recipe was very handy for substitutions in that regard.  I used up the last of a bag of dried cherries and the last of a Ziploc bag of nuts and dried fruit/seed trail mix from a party (peanuts, raisins, cranberries, pineapple, sunflower and pumpkin seeds, and almonds).  I added a handful of cocoa dusted almonds, the toasted oats, and the coconut.

20160729_120723-1

This mixture is a little heavy on the oats, and I found myself missing the stickiness of the agave nectar in the previous granola.  It isn’t bad, but it is very dry, making it a little difficult to eat by the handful.  I would definitely put it in yogurt for a hearty breakfast, but personally, I prefer the texture of the other recipe.  I’ve eaten this one a couple of times in a bowl with milk, like a regular cereal, and it’s better that way.  I love the bursts of flavor from the cherries and raisins. Even the dried pineapple, which I find much too sweet when eating trail mix, sort of disappears and becomes more palatable here.  Verdict: as a cereal, a keeper; as a trail mix, passable, but better options available.

Brisket Tacos, aka Pulled Pork Sandwiches

When there’s a 4 pound pork roast taking up a good portion of your freezer, there comes a day when you just have to handle it.  Last Thursday, Husband’s car needed some work done, so I walked over to a local coffee shop with a pile of food magazines and recipe file folders and set about finding some new meals.  Quite a few were just a little behind the CSA produce schedule (lentil/Swiss chard/tofu tacos; spinach mint pesto), but this easy BBQ was of interest because I didn’t want to turn on the oven, and my slow cooker and I get along fine. I know the recipe says beef, but see note regarding pork above.  No reason not to make pork tacos instead.  This is from Good Housekeeping‘s June 2015 issue, and I starred a bunch of recipes highlighting summer produce.

http://www.goodhousekeeping.com/food-recipes/a32690/bbq-brisket-tacos/

Ingredients

  • 1 c. ketchup
  • 3 tbsp. spicy brown mustard
  • 3 tbsp. balsamic vinegar
  • 1 tbsp. Worcestershire sauce
  • 3 cloves garlic, crushed with press
  • 1/4 c. The Ultimate Rub
  • 1 beef brisket (about 3 to 4 lbs)

Directions

  1. Spray bowl of 6-to 8-quart slow coker with nonstick cooking spray. Add ketchup, mustard, vinegar, Worcestershire sauce, and garlic; whisk to combine.
  2. Coat brisket on all sides with The Ultimate Rub; add to slow-cooker bowl. Cover and cook on Low 8 hours or until tender but not falling apart.
  3. Transfer brisket to cutting board. With 2 forks, shred meat. Return meat to slow-cooker bowl; stir to coat with sauce.
  4. Serve pulled brisket with tortillas and cilantro leaves, radishes, limes, cheese, and choice of salsa.
Abou 335 cals, 33g protein, 32 g carbs, 9 g fat (3 g sat), 4 g fiber, 810 mg sodium.

I had a little twinge of panic when I saw the recipe calling for a spice mixture on a very different page in the magazine, but of course, a Google search brought it up in no time. It’s also linked in the original recipe posted on GH‘s website.

http://www.goodhousekeeping.com/food-recipes/a32728/the-ultimate-rub/

Ingredients

  • 1/4 c. brown sugar (be sure to break it up)
  • 2 tbsp. Kosher salt
  • 2 tbsp. ground coriander
  • 2 tbsp. ground cumin
  • 2 tbsp. garlic powder
  • 1 tbsp. ground ginger
  • 1 tbsp. smoked paprika
  • 1 tbsp. black pepper
  • 1 tsp. cinammon

Directions

  1. In medium bowl, stir together brown sugar, kosher salt, coriander, cumin, garlic, ginger, paprika, black pepper, and cinnamon. Store in an airtight container or a resealable plastic bag up to 6 months.
  2. For: 1 1/2 pounds steak, use 2 tablespoons.; 1 pound vegetables, use 1 tablespoon.; 2 pounds bone-in, skin-on chicken parts, use 1/4 cup.; 1 pound salmon fillets, use 3 tablespoons.

It didn’t take me long to decide that I didn’t want to deal with all those spices.  It was already almost noon, and if I got this baby cooking quickly there was a good chance we could eat it for dinner.  So I used a smoky barbecue steak seasoning rub we already had on hand instead of  The Ultimate Rub.

I made the barbecue sauce as listed, even though food critic comments rang in my ears as  I measured out the ketchup.  I used horseradish mustard and accidentally doubled the Worcestershire sauce because I switched it with the balsamic vinegar proportion on the next line.  So I reduced the vinegar by a tablespoon to balance it out.  My pork was still frozen, so I couldn’t cut it into 2 pieces, but I did make a deep cut down the middle and rubbed the dry spice into the cut.  I set the cooker on high since I was looking for a finished product in about 6 hours.

After about 4 hours, I made some more cuts and flipped the pork over to get that sauce well distributed.  Everything was looking great, though I could tell this meat wasn’t going to shred nicely.  After about 6 1/2 hours, the meat was registering above 155°, so I pulled the roast out and began to slice it into bite sized chunks.


 20160729_190054-1

Verdict: While the meat wasn’t as tender as I would have liked, the flavor of the rub and the sauce was excellent.  There was a great sweet and spicy combination going on here, and while the rub itself smelled smoky at the beginning of the cook time, the smoky flavor wasn’t really apparent afterwards.  This photo shows a sandwich, which I ate the first night, but I did make it into a taco a couple of days later with the leftovers.  I used white corn tortillas, topping the pork with shredded lettuce and some spicy green tomatillo salsa.  I would make this again, but plan to cook the pork (fully thawed) on low for a longer amount of time to improve the tenderness.  Topping the meat (sandwich or taco) with some creamy coleslaw would also be a great alternative  to the  shredded cabbage and sliced radishes suggested in the original.

Sausage Hodgepodge

Good Morning, boys and girls! Today’s recipe is called clean out the freezer.  I was digging around in there the other day, looking for inspiration to go with the latest batch of recipes.  I found 2 pieces of Polish sausage, a 4 ounce length of andouille kielbasa, and countless gourmet hot dogs. My initial goal was to use the CSA fennel in a more creative way than just grilling or roasting, and those random sausages became key players.  I opted for the Polish and andouille sausages, and added 2 smoked brats from our refrigerator to the medley (calm down, purists, it turns out fine).  This recipe isn’t in the pile, because it is still intact in the pages of the March 2016 issue of Food Network Magazine.

http://www.foodnetwork.com/recipes/food-network-kitchens/sausage-and-bean-stew.html

Sausage and Bean Stew

Ingredients

2 tablespoons extra-virgin olive oil
1 pound hot and/or sweet Italian sausage, cut into 1-inch pieces
6 cloves garlic, chopped
2 carrots, chopped
1/2 fennel bulb, cored and chopped
1/2 onion, chopped
1 tablespoon fresh thyme
Kosher salt and freshly ground pepper
1/2 cup panko breadcrumbs
1 15 .5 ounce can navy beans (do not drain)
1 15 ounce can cherry tomatoes

Directions

1. Heat 1 tablespoon olive oil in a large ovenproof skillet over medium-high heat; add the sausage and cook, stirring occasionally, until browned, about 5 minutes. Transfer to a plate using a slotted spoon.

2. Reduce the heat to medium low and add the garlic to the skillet. Cook, stirring often, until lightly browned, about 2 minutes. Add the carrots, fennel, onion, 2 tablespoons water, 1/2 tablespoon thyme and 1/2 teaspoon each salt and pepper. Cook, stirring occasionally, until the vegetables soften, 15 minutes.

3.Preheat the broiler. Combine the panko with the remaining 1 tablespoon olive oil, 1/2 tablespoon thyme and 1/4 teaspoon each salt and pepper; set aside. Return the sausage to the skillet along with the beans and their liquid, the tomatoes and 1/2 cup water. Bring to a boil, then reduce the heat to medium and gently simmer until the liquid is slightly reduced, about 5 minutes.

4. Sprinkle the panko mixture evenly over the stew and broil until golden, about 4 minutes.

So we’ve already discussed my substitutions on the sausages (note, mine were already all cooked, but I did brown them beyond 5 minutes because I love the caramelization).  I opted for baby carrots because of a clearance deal discovered on a Woodman’s outing last Wednesday.  We’re making every effort to up our veggie intake around here, so while I usually say 4 baby carrots equals a regular carrot, today I used about a half pound of baby carrots, which I cut into cute diagonal pieces.

I wish fennel was easier for me to use without it being a big production, because I love the way it smells when you chop it up.  If you aren’t familiar with using it (except for the seeds you see on pizza or in sausage or stuffing breads), the bulb has the texture something between a celery stalk and cabbage, and once manipulated, releases this lovely licorice smell.  My dad and I used to fight over the black jelly beans, so any occasion I have to play with anise or the basil family takes me back to those days (my dad can’t have Vitamin K anymore, so the black jelly beans are all mine now).

Today’s recipe also had me stripping fresh thyme from the garden.  I put everything in the skillet as directed (well, I actually added my garlic a little after the onions and fennel so it wouldn’t scorch).  As you may know, we’re mostly eschewing gluten here for a time, so I skipped the panko step altogether. Also, who buys cherry tomatoes in a can?! I used fresh!  We didn’t have navy beans in the house, so I used pinto beans (it seemed the most neutral of the beans in the pantry).

Once I added the beans and tomatoes to the pan, I let it simmer a long time (20-30 minutes). I wanted those carrots tender, and I wanted the tomatoes to burst and release all their juices (I probably should have halved them, but lazy).  The result was a lovely thick liquid that was sweet and savory from all these flavors.  Once the sausage went back in the pot the end result was heavenly.

20160730_182852

Verdict:  for a relatively minimal amount of prep, this hands-off dish is definitely worth another go.  You could experiment with different beans and sausage profiles–the smoked brats were the least successful here. For a healthier version you could use chicken or turkey sausage, or go meatless with soy crumbles or tempeh.  From the tomatoes which didn’t pop during cooking, I loved the burst of juice as I bit into each one (a sensation I would have hated just a few years ago– texture issues).  I might wilt some thinly sliced kale in here during the last 5-10 minutes for some color and texture–it seems like the right thing to do.  I honestly didn’t miss the panko.  I’m sure it adds some crispiness and a little punch of herbs, but the dish is seriously fine without it.  This will be a great hearty staple once cooler weather comes. I’m looking forward to it already.


Coffee Breakfast

I was absolutely intending to post last night’s dinner today, but while the coffee maker was doing its thing this morning, I took a couple of minutes to sort through some clutter on the kitchen table.  I came across a smoothie page from Good Housekeeping, July 2015.  My friend Mary mentioned her morning routine of smoothies and coffee after she read yesterday’s post, and I found one that mingles the two.  Unfortunately, most of the smoothies in the article are adapted from a GH cookbook, so there is no link with all 10 recipes on the same page.  I’m putting a picture of the page here; you can search for individual recipes on their website.

20160731_074542-1

Java Banana Smoothie

Blend 2 ripe bananas, preferably frozen; 3/4 cup each chilled coffee and milk; 3 T brown sugar; and 1 cup of ice until smooth (serves 2).

I brewed a strong mixture of Kirkland’s medium roast coffee with a flavored Kahlua and creme blend from a cute boutique in suburban Geneva, Illinois.  While that coffee chilled (1/2 cup coffee with enough ice to equal 3/4 cup), I zapped a bag of frozen bananas for 10 seconds in the microwave, long enough to allow me to chip off the equivalent of 2 bananas.  I was really tempted to use buttermilk (Woodman’s clearance, 50 cents a quart), but I opted for vanilla soy milk instead since I didn’t think anyone else would try this recipe with buttermilk.  3 tablespoons of brown sugar? Ridiculously excessive!  I used (against my better judgment), 1 scant tablespoon of vanilla sugar from the Spice House (also in Geneva, IL, and other locations).  The things I do for my readers!  I did throw in a scoop of protein powder and didn’t use a whole cup of ice; I eyeballed between a half and three-quarters of a cup.

20160731_071735-1

Verdict: ERMIGERD! Delicious! The soy  milk set off the strength of the coffee, leaving just a hint of the bitterness that I love.  The sugar content was still more than I needed, but I can see where non-coffee drinkers would need the sweetness.  The texture was smooth and creamy, the banana flavor just slightly more prominent than I would have expected (I found myself searching for it, which wasn’t a bad thing).  I hardly ever bother with ice in a smoothie because I usually don’t drink them quickly enough; I hate the separation that occurs when the ice starts to melt.  But this concoction stayed pretty well blended. Mary’s peanut butter powder would not fight with the coffee or banana here, so she should put some bananas in the freezer and plan to make this one soon.  I know I’ll be making it again!  And if you wanted to add a shot of real Kahlua for an afternoon or happy hour treat, I wouldn’t tell anyone….

Morning Smoothies

My summer walking bestie and I switched up our routine this week.  Instead of our usual hour at a local park, we headed out to a historic Chicago neighborhood to admire old architecture and some phenomenal landscaping.  Turns out the neighborhood is a little hilly (for a plains state), and we were able to get more steps and a more challenging workout.  I haven’t been as routine as last summer about my post-walk breakfasts (for a variety of reasons), but this smoothie caught my eye the other day because we have a lot of fresh mangos in the house.

This recipe is from a feature of 4 smoothies from Prevention Magazine, January 2014.  The mango one has been reblogged quite a few times (thanks, Google), but all 4 recipes are in the link.

http://www.prevention.com/food/healthy-eating-tips/super-healthy-smoothie-recipes/slide/4

Mango-Strawberry Power-Up

SERVINGS: 2.5

¾ c coconut water
½ c 2% plain Greek-style yogurt
1¼ c frozen mango chunks
¼ c frozen strawberries (about 5)
2 Tbsp almond meal (ground almonds)
1 Tbsp fresh lemon juice

Combine ingredients in high-power blender and puree until smooth. Divide between 2 glasses.

NUTRITION (per serving) 181 cal, 8 g pro, 30 g carb, 4 g fiber, 24 g sugars, 4.5 g fat, 1 g sat fat, 27 mg sodium

Variations:

Change the flavor: swap frozen peaches for the mango, or use a frozen tropical fruit blend.

Pump up protein: Add raw almond butter or unsweetened whey protein powder plus a dash of pure vanilla extract.

Pack more potassium: Toss in a banana (sliced and frozen) or a few golden kiwifruits.

I put a chopped mango in the freezer along with the strawberries, then went about some other business while I waited for the fruit to firm up (note– must plan ahead for this smoothie unles you have frozen mango in the house).  I used a handful of almonds instead of almond meal and bottled lemon juice instead of fresh. I also put in a scoop of my protein powder, which adds about 110 calories.

20160729_104432-1

Verdict: refreshing and sweet! This was a perfect breakfast.  Skip the yogurt or substitute soy yogurt to make this vegan.  Confession: I made the batch as listed here and drank the whole thing myself, but it really served as breakfast and lunch, so I don’t feel guilty about the calories.   Here’s some confusion though– the original recipe lists the servings as 2.5, but says divide between 2 glasses.  So is the calorie count here for 1/2 the recipe, or one serving?  I don’t care that much, since I’d rather get 24 grams of sugar from real fruit than a can of pop, but the inconsistency made me wonder.  I also have made the beet orange smoothie that you’ll see if you click the original recipe link, and I thought that one was tasty as well, though a little earthier than this one.  Maybe it’s time to get back on the smoothie bandwagon–it’s just a little weird to sit back and linger over a cup of coffee when breakfast is another beverage.

Spicy Salmon

I love challenging myself to get a decent dinner on the table in a reasonable amount of time, even on a busy day.  Husband has a devilish commute, so I usually beat him home by 60 to 90 minutes. Because cooking is a therapeutic meditation for me, I like to wind down with a recipe (okay, and a glass of wine) and a little music, and see if I can be ready to serve a great meal as Husband walks in the door.

Yesterday I helped my mother-in-law out with my twin niece and nephew.  I got home around 4, fed the cats, and got to work on this Chipotle-Orange-Glazed Salmon, a recipe from Dr. Oz’s Eat What You Love diet, featured in Good Housekeeping, April, 2012.

http://www.goodhousekeeping.com/food-recipes/a13937/chipotle-orange-glazed-salmon-recipe-ghk0412/

Ingredients

  • 1 c. quinoa
  • 1 orange
  • 1 chipotle chile in adobo sauce
  • 2 tsp. adobo sauce (from chipotle chiles)
  • 1 clove garlic
  • ½ tsp. ground cumin
  • 1 bunch radishes
  • ½ c. fresh corn kernels
  • ½ c. fresh cilantro leaves
  • 2 green onions
  • salt
  • 4 pieces skinless salmon fillet

Directions

  1. Arrange oven rack 4 to 6 inches from broiler heat source. Preheat broiler on high. Line jelly-roll pan with foil. In 2-quart saucepan, prepare quinoa as label directs. Transfer to bowl.
  2. Meanwhile, from orange, grate 1 teaspoon peel and squeeze 1/2 cup juice. In blender, puree chipotle, adobo sauce, garlic, cumin, and orange juice.
  3. To bowl with quinoa, stir in radishes, corn, cilantro, green onions, orange peel, and 1/8 teaspoon salt.
  4. Arrange salmon on prepared pan. Sprinkle with 1/8 teaspoon salt, then brush generously on all sides with chile mixture. Broil 5 to 7 minutes or until just opaque throughout. Serve salmon on quinoa pilaf.

I juiced my lonely orange and came up with 1/4 cup of juice, so I began to thaw only 2 salmon filets and cut this recipe in half (I was generous with the chipotle chile and adobo sauce). Once the quinoa was at a simmer, I put my dehydrated orange peel (lazy) in the pot and let it do its thing.  We have this great miniature food processor, so I put all the glaze ingredients in there and gave it a spin.

I’ve told you before how my broiler and I don’t get along, plus, it’s still hovering close to 90 degrees here.  I put my thawed salmon filets in a tiny (foil-lined, sprayed with non-stick spray) baking pan that fits perfectly in our toaster oven.  It has a broil setting, but I decided to bake the fish instead (I have trust issues with all broilers).  I salted and peppered the filets, poured the glaze over the fish, and set the temp at 400 and the time at 30 minutes.  While the salmon cooked, I swapped out the corn for seedless cucumber (corn is on the no-no detox list). Our radishes were a little limp so I opted to skip those as well.  Husband walked in the door just as I was ready to check the temp of the fish– which was ready to go (it probably would have been fine after 20 minutes, but it was juicy and delicious despite the extra cooking time).

20160726_182018-1

Verdict:  the radish would have been nice for color and crunch, but the cucumber was crisp and a decent substitution.  The garlic in the fish glaze was subtle and the orange peel in the quinoa was barely detectable.  I think a squeeze of orange juice over the finished mix would have been a nice touch (if I had any oranges left).  The spice level on the fish was pleasant and the quinoa was a perfect accompaniment–it could have used a little more salt, but the vegetables and cilantro were very fresh and light.  We will definitely be making this again, and Client will likely be seeing it as well.